Egg Avocado Toast

This recipe combines my love of avocados with my favorite breakfast go-to, eggs. I started making this as something cool I stumbled upon online, and it soon became my morning staple on the days I workout (aka the days I am up early).

What I love about this toast is that it takes minutes to make and is so healthy for you! I usually eat this before a workout so only 1 piece of toast works for me. You can easily eat this as a sandwich and add another piece of toast on top, or make 2 open face sandwiches.

Egg Avocado Toast

egg avocado toast

Ingredients

1 piece of sliced bread (any kind you like)
1 egg
1/2-1 avocado (I usually use 1/2 per slice of bread)
1 tsp butter or oil
Kosher salt

Directions

1. Toast your bread
2. Spread on your avocado
3. Add salt
4. Cook your egg and add it on top

Place your bread in the toaster oven (or however you like to toast your bread). Toast bread to your liking.

Heat a small pan with olive oil or butter and wait until the butter melts and starts to sizzle. Crack your egg into the pan to fry it. Flip the egg once the sides get a little brown and the white part starts to solidify. Cook the egg to your liking.

Meanwhile, slice open your avocado and take out the pit if that’s the half you choose to use. I usually choose the “un-pitted” half first, and drizzle the half with the pit with lime juice, wrap it tightly in tin foil, and put it in the fridge to use for the next day.

**Avocado tip: The easiest way to get the avocado flesh out of the skin is to run a knife horizontally through the flesh until your knife hits the skin (do not pierce the skin). Create these slits throughout the whole half making parallel horizontal cuts. (You can run your knife the opposite way making your way down the avocado creating squares and it comes out even easier). Then take your knife and run it along the outside of the flesh where the flesh meets the skin. Run your knife all the way around and under the flesh and the pieces you just cut should fall out easily. **

Once your bread is toasted place it on a plate, and add your cut avocado on top of the bread. Mash the avocado into the bread creating more of a spread than pieces of avocado. Sprinkle kosher salt on top of the avocado (trust me this makes a HUGE difference! Salt on avocado and salt on eggs is a necessity to greatness!). Once your egg is cooked to your liking place it on top of the avocado, and vuala!

egg avocado toast2

Recipe source: http://thecornerkitchenblog.com/avocado-toast/

Whiskey Orange Chipotle Chicken

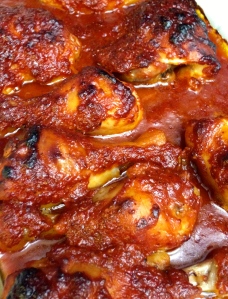
Need a great, easy recipe for Superbowl Sunday? You HAVE to try this spin on your classic “chicken wings.” This recipe uses chicken drumsticks and thighs and is baked rather than fried. It is easy to prepare and just as easy to make without the mess of frying. This chicken will leave your body feeling warm from the kick of all the great flavors.

This recipe packs a punch! The marriage of the whiskey, orange marmalade, and chipotle peppers is genius! What I love about this recipe is that it needs to be marinated and can sit in the fridge for up to 2 days. I also chose this recipe because my husband is becoming a whiskey guru so I have quite of a bit of good whiskey on hand! 

It is a great recipe for those on-the-go because you can prep it ahead of time and it will be ready when you need it. Leftovers keep great and you can even shred the chicken off the bone and eat it cold in a salad or make some yummy chicken salad with it! Oooo that gives me a great idea for a new recipe!

Whiskey Orange Chipotle Chicken

whiskey orange chipotle chicken

Ingredients

1 8-oz can chipotle peppers in adobo sauce (use only half the can to make it less spicy)
1 1/2 cups orange marmalade (preferably natural kind with no high fructose corn syrup added)
1 6oz can tomato paste
1/2 cup whiskey (substitute orange juice for a non-alcoholic version)
4 garlic cloves, peeled
1/3 cup olive oil
1 tablespoon + 1 teaspoon kosher salt
1 teaspoon black pepper
6 chicken thighs, bone-in, skin-on
6 chicken drumstick, bone-in, skin-on
You can always use all drumsticks, or all thighs, make this recipe your own!

Directions
In a food processor or blender, combine the chipotle peppers and adobo sauce, orange marmalade, tomato paste, whiskey, garlic, olive oil, kosher salt, and black pepper. Puree until smooth. Pour marinade over chicken thighs and drums, and let marinate in a sealed bag or air-tight container (I use tupperware) at least 8 hours or up to 2 days.

To cook:
Preheat the oven to 400 degrees. Arrange chicken thighs and drums in a dish that is large enough to host all your chicken. I used a large glass pyrex dish, but if you have a roasting pan you can use that as well. Place the chicken in the dish/pan skin-side up.  Pour in the marinade on top of all the chicken smothering the chicken in the sauce. Bake for about 45-55 minutes or until fully-cooked and the skin is fully caramelized and crispy (meat thermometer will read about 170 on the thickest part of the thighs).

whiskey orange chipotle chicken2

Recipe source: http://www.alwaysorderdessert.com/2012/04/whiskey-orange-chipotle-chicken-thighs.html

Cheddar and Scallion Garlic Bread

I bought this Scallion Garlic butter at whole foods the other day and I had a whole stick of it. I have been using it with eggs, using it to cook meat and fish but still had quite a bit left. I saw that Giada made this cheddar and scallion garlic bread and I thought, “I have all those ingredients in one stick of butter!” So this recipe was super simple for me because most of the ingredients were already marinading together, all I had to do was add the cheddar cheese!

Below are the ingredients in case you don’t already have a stick a butter that has those ingredients in it. Even if you don’t already have a pre-made butter, this recipe is really easy and super yummy! I will never eat garlic bread the same way again!

Cheddar and Scallion Garlic Bread

cheddar scallion garlic bread

Ingredients

8 ounces sharp cheddar cheese, shredded or coarsely grated
6 ounces butter, at room temperature
4 scallions, finely chopped
2 cloves garlic, chopped
Kosher salt and freshly ground black pepper
1  loaf ciabatta bread, cut in half horizontally

Directions

Place an oven rack in the center of the oven. Preheat the oven to 400 degrees F.

In a food processor, combine the cheese and butter. Process until the mixture is smooth. Add the scallions and pulse until combined. Season with salt and pepper, to taste. Spread the cheese mixture on the cut sides of the bread. Sprinkle a little bit of shredded cheddar cheese on top of the spread for extra cheesiness! Place on a baking sheet and bake for 10 to 12 minutes until golden.

Using a serrated knife, cut the bread into 1-inch thick slices and serve.

Recipe source: http://www.foodnetwork.com/recipes/giada-de-laurentiis/cheddar-and-scallion-bread-recipe/index.html

Pasta with Olives and Breadcrumbs

This recipe was probably one of the first dishes I ever really made that was more than mac and cheese from a box. My husband is sick so I wanted to make something quick and easy (and yummy!) and this recipe came to mind! I absolutely love olives and my husband has had an obsession with Bloody Mary’s lately so I had a huge jar of olives with pimentos on hand. I used olives with pimentos but you can use any kind of green olives you’d like. You can even add kalamata if you like those as well.

Pasta with Olives and Breadcrumbs

pasta with olives and breadcrumbs

Ingredients

1 pound of pasta of your choice (I used penne because that was just what I had on hand)
3/4 cup extra-virgin olive oil
2/3 cup italian dried bread crumbs
1/4 teaspoon sea salt, plus more for seasoning
1/4 teaspoon freshly ground black pepper, plus more for seasoning
3/4 cup pitted and roughly chopped green olives
1/3 cup freshly grated Parmesan
1/4 teaspoon red pepper flakes (for a little spice)

Directions

Bring a large pot of salted water to a boil. Add the pasta and cook, stirring occasionally, until tender but still firm to the bite, about 8 minutes.

Meanwhile, in a large saute pan, heat the oil over medium-high heat. Add the bread crumbs and 1/4 teaspoon each of the sea salt and pepper. Add in the red pepper flakes if you want to add a little spice to the dish, if not simple omit the ingredient. Stirring constantly, cook the breadcrumbs until golden brown, about 2 minutes. You want to keep the breadcrumb mixture moist so if you need to add more olive oil go ahead and do so.

Drain the pasta, reserving 1 cup of the pasta water. Stir the pasta into the bread crumb mixture. Remove the pan from the heat and add the green olives. Add the Parmesan cheese, and season the pasta with salt and pepper, to taste. Gently toss to coat, adding reserved pasta water, if needed, to loosen the pasta.

Recipe source: http://www.foodnetwork.com/recipes/everyday-italian/spaghetti-with-olives-and-bread-crumbs-recipe/index.html

Halibut with lemon-basil pesto

So I am continuing my love of pesto with yet another great pesto recipe! This pesto recipe is a classic, but when paired with a nice, moist, whitefish it brings my love of pesto to a whole new level!

The original recipe called for Sole, but I couldn’t find it at the grocery store. I went for another great, never-fail whitefish, Halibut. You can use any whitefish you choose just make sure its a thinner cut rather than a thick steak-like fish. As you can see in the photo below, I chose a simple couscous as my side. The pesto was just as good on the couscous as it was on the fish!

Halibut with Lemon-Basil Pesto

halibut with lemon basil pesto

Ingredients

Fish marinade:
1/4 cup, plus 1 tbsp extra-virgin olive oil
2 tbsp fresh lemon juice (approx 1 large lemon)
2 large garlic cloves, smashed
1/4 tsp kosher salt
1/4 tsp freshly ground black pepper
8 (2-oz) skinless halibut fillets

Pesto:
2 cups packed fresh basil leaves
1/3 cup pine nuts, toasted *
Zest of 1 large lemon
2 tbsp fresh lemon juice (approx 1 large lemon)
1 garlic clove, smashed and peeled
1/2 tsp kosher salt
1/4 tsp freshly ground black pepper
1/3 cup extra-virgin olive oil
1/3 cup freshly grated Parmesan cheese

Directions

First you want to marinade your fish. To do that, combine 1/4 cup of the olive oil, the lemon juice, garlic, salt, and pepper. Whisk the marinade to blend. Pour the marinade into a deep bowl or pan and add in your halibut. Turn the fish several times to coat evenly. Let the fish marinade for about 15 minutes.

While your fish is marinading its time to make the yummy pesto. To do so you will want to bring out your food processor or blender. Pulse the basil, toasted pine nuts, lemon zest, lemon juice, garlic, salt, and pepper, until finely chopped. With the machine running, gradually add the olive oil and blend until the mixture is smooth and thick. Add the cheese and pulse until just incorporated.
(*To toast the pine nuts, arrange in a single layer on a rimmed baking sheet. Bake in a preheated 350 degree oven until golden, about 6 minutes. Let the pine nuts cool completely before using).

Once your fish has marinated, heat a large nonstick skillet over medium-high heat. Add the remaining 1 tbsp of olive oil to pan. Remove the fillets from the marinade, letting any excess marinade drip off, and add to the hot pan. Sear for 3 minutes and then turn the fish over. Sear until the fish has cooked through, about 3 minutes longer.

Top each serving of fish with that delicious lemon-basil pesto and serve!

Recipe source: Giada’s Feel Good Food book

Pasta with Spicy Pesto

Anything pesto I love (you will see that in posts to come). Pesto is an easy, healthy sauce that keeps well in the fridge. You can make pesto in batches and use it on pasta or use it as a spread on sandwiches! Again, since my husband is a fan of spicy food, I kicked my love for pesto up a notch and added a special ingredient that gives it a nice kick.

Fusilli with Spicy Pesto

spicy pesto pasta

Ingredients

Pesto:
1 cup chopped walnuts
2 cloves garlic, coarsely chopped
1 (~2-inch long) jalapeño pepper, stemmed and coarsely chopped
2 cups grated (4 ounces) Asiago cheese
2 teaspoons kosher salt
1 teaspoon freshly ground black pepper
3 ounces baby spinach
3 ounces arugula
1/4 cup extra-virgin olive oil
1 pound fusilli pasta

Directions

Bring a large pot of salted water to a boil over high heat. Add the pasta and cook until tender but still firm to the bite, stirring occasionally, about 8 to 10 minutes. Drain and reserve about 1 cup of the pasta water.

For the pesto: In a food processor, combine the walnuts, garlic, jalapeño, cheese, salt and pepper. Process until the mixture is smooth. Add the spinach and arugula and process until blended. With the machine running, gradually add the olive oil.
(If you don’t like things spicy, remove the seeds from the jalapeño pepper. If you like it more spicy, add more than just 1 jalapeño).

Place the cooked pasta and pesto in a large serving bowl. Toss well and thin out the sauce with a little pasta water, if needed.

Season with salt and pepper, to taste. Garnish with Asiago cheese and serve.

Recipe source: http://www.foodnetwork.com/recipes/giada-de-laurentiis/fusilli-with-spicy-pesto-recipe/index.html

Being Shop Conscious

Today’s post isn’t a recipe but rather a tip from yours truly. I was watching “The Chew” today (as I do most days), and they were talking about the fact that most people waste money by wasting food. Me, being as organized as I am, do not like to waste food. In fact I would like to share a few tips with you on how I shop smart so I do not throw away money and essentially save money by doing so.

Big food

Food waste

1. Do not impulse buy. Or for me, do not go shopping with your husband. 
Shopping with my husband ends up in a lot of impulse buys. Impulse buys can be considered as items on sale or items that just look tasty the moment you see them. I do most of the cooking at our house so I know what we have, what we need, and what we won’t eat. I like to go into the grocery store, and leave just with what I know I need.

2. Stick to your grocery list. 
Shopping for some individuals can be stressful and most dread the grocery store. My advice is to plan out your meals for the week and put together a list of ingredients you need at the store. Therefore when you go to the grocery store you simply go in, buy the things on your list, and leave.

3. Prepare meals according to what you have.
When preparing meals, its best to see what you already have stocked in your fridge or pantry and base your meals off of that. Also do not choose recipes with random, weird ingredients you may never use again. If you end up buying those random ingredients just for a pinch of it you will end up throwing it away before it can all get used. You want recipes that involve ingredients you are familiar with and know that can be used in future recipes. However, if you are going to buy those random ingredients because that recipe just looks too good to pass up, go to a grocery store where you can buy just as much as you need of it.

4. Be bulk-shop smart.
Shopping in bulk definitely saves you money, but if you do not end up using the things you buy in bulk you could technically end up “throwing money away.” Shop for things you know you eat often enough to use, or shop for things that will expire in a long enough period of time that you will be able to use it before it goes bad. My bulk purchases usually consist of toilette paper, paper towels, almond milk, and coconut water. I drink coconut water every day and they have a long shelf life so none of it is ever wasted. The same goes with almond milk. Also both the almond milk and coconut water do not need to be refrigerated until opened so I can leave room in my fridge for the things that actually need it.

Tips for saving your produce
Produce is usually the first to turn vile, so here are a couple tips to use your produce before it goes bad:

1. Use unused vegetables to make a stock or soup. You can also used vegetables to make a stir fry, or a rice or quinoa dish with roasted veggies. (I am conspiring a recipe to come soon!)

2. Use unused fruit to make smoothies, or juices. Smoothies are a healthy, great way for someone on-the-go. You can also use the pulp from the juicer and bake it for a dried fruit snack.

Spicy Orange Garlic Shrimp

There isn’t much of an intro needed for this recipe but let’s just say this took shrimp to a whole new level! And super easy too!

Spicy Orange Garlic Shrimp

orange shrimp

Ingredients

  • 24 pieces (26-30 Per Pound) Peeled and Deveined Shrimp
  • 2 cloves (to 4 Cloves) Garlic, minced
  • ¾ cups Orange Juice (Use a nice high quality orange juice)
  • ½ teaspoons Ground Cayenne Pepper
  • 1 teaspoon Old Bay Seasoning
  • 3 Tablespoons Salted Butter, Divided

Directions

If the shrimp you bought is frozen, thaw them by running them under cold water for about 5 minutes. Dry the shrimp by draining them on a paper towel or two.

Add the garlic to the orange juice. Measure out and add all of the spices to the orange juice as well.

In a large skillet over high heat melt 2 tablespoons butter. Once the butter has melted add in your shrimp. Cook them for about 30-60 seconds and begin flipping them over starting with the ones you placed in the pan first so they don’t get overdone. Cook for another 30-60 seconds. Remove the cooked shrimp from the pan, leaving the heat on high.

Once the butter and drippings begin to smoke ever so slightly add the spicy orange garlic mixture to the pan and give it a good stir. Add the last tablespoon of butter to the sauce and after a few minutes of cooking and occasional stirring your sauce should be slightly thicker. The sauce should reduce quite a bit as well to almost nothing.

Return the shrimp to the pan and give them a nice toss to coat them in the sauce. Allow an intermingling of souls to take place for just a few seconds and then it’s time for the fireworks.

I served my shrimp over a bed of brown rice, but for more protein quinoa will be just as tastey!

Recipe source: http://tastykitchen.com/recipes/main-courses/pastor-ryane28099s-spicy-orange-garlic-shrimp/

Zesty Fish Tacos

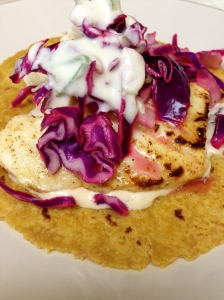
The best gift I got from my bridal shower was a recipe book that had a bunch of recipes from my family and friends. One of those recipes was a fish taco recipe from my aunt. I tried it once and it was great but of course it was missing that “spicy” factor. I found another recipe from one of my new favorite shows, The Chew, and combined to 2 recipes.

Zesty Fish Tacos

Fish Tacos

Ingredients

Halibut (cut into 1/4 pieces)
2 tbsp lime juice (about 1 lime)
1/4 cup olive oil
1/2 tsp cumin
1/2 tsp chili powder
1/4 tsp salt
corn or flour tortillas (I used corn, but either will work)

For the Spicy Crema:
2/3 cup greek yogurt
2 teaspoons chopped Chipotle Peppers (in adobo sauce)
Salt

For the Lime Crema:
1/2 Greek Yogurt
1 whole green onion, thinly sliced
1 tbsp finely chopped cilantro (I don’t like cilantro so I didn’t use it but if you do, I suggest using cilantro)
2 tbsp freshly squeezed lime juice (about 1.5 limes)
1/4 tsp lime zest
1/2 tsp salt

For the Cabbage Slaw:
2 cups shredded Purple Cabbage
1/2 Red Onion (slivered & rinsed with water)
2 tablespoons White Wine Vinegar
Juice of 2 Limes
Salt
Cracked Black Pepper

Directions
Prepare the spicy crema: Stir together all ingredients and adjust seasoning to taste. Set aside.
Prepare the lime crema: Whisk together all ingredients and adjust seasoning to taste. Let it stand at room temperature for about 30 minutes before serving.
Prepare the cabbage slaw: Toss the ingredients together in a large bowl and set aside. This can be covered and stored in the fridge a few hours in advance.
(Tip: For the cabbage slaw, rinse the sliced onions in cold water to reduce their strong flavor. Or, you can substitute the raw onions for pickled onions, if you prefer.)

For the fish, whisk together the lime juice, olive oil, cumin, chili powder and salt, and pour over fish. Marinate at room temperature for 10-15 minutes.

Add some olive oil to a pan and heat over medium-high heat. When the oil starts to sizzle, add in the halibut and cook for about 2 minutes on each side, or until cooked through.

Once the fish is cooked through it’s time to assemble!
To assemble, spread a tablespoon of spicy crema onto the center of a corn tortilla. Place a piece of  fish over sauce. Top with Cabbage Slaw. Add another tablespoon of the lime crema to the top. Garnish with lime wedges.

Fish Tacos

Recipe source: http://abc.go.com/shows/the-chew/recipes/Fried-Fish-Tacos-Clinton-Kelly

Honey Sesame Chicken

I got a crockpot as a wedding present and haven’t done much with it yet. However, I found this recipe for a honey sesame chicken and thought it would be a good start!

Crock Pot Honey Sesame Chicken

Honey Sesame Chicken

Ingredients

  • 3-4 Boneless/Skinless Chicken breasts
  • Pepper
  • 1/2 white onion, chopped
  • 3 garlic cloves, minced
  • 1 C honey
  • 1/2 C low sodium soy sauce
  • Approx. 2 tbs olive oil
  • 1/2 tsp cayenne pepper
  • 1/3 C water
  • 3 scallions- chopped
  • sesame seeds
  • quinoa

Directions

  1. Lightly season chicken with pepper and place in crockpot
  2. Combine onion, garlic, honey, soy sauce, oil, and pepper over the chicken.
  3. Cook on low for 6 hours
  4. After about 4 hours I added in some water to the crock pot and after 6 just turned it to the “warm” setting
  5. Remove chicken and shred into bite-size pieces (here you can either set aside or put back into the sauce). You can shred the chicken with a fork, or I have seen it done in a kitchen aid too just keep the speed to semi-low.
  6. Prepare quinoa according to directions on package
  7. Serve quinoa onto plates, top with chicken and spoon sauce on top.
  8. Sprinkle sesame seeds and the chopped scallions over the top

Now as you might know by now, my husband likes things spicy. If you like it spicy I would add 1 tbsp of hot sauce or chili sauce into the crock pot so it absorbs in the whole dish. Or you can always taste the sauce before you serve it and add in your hot sauce then.

I  got this recipe on a fitness website so I knew it would be healthy. The author pairs this recipe with a workout routine so you can find the original workout and recipe here: http://fitandbusy.wordpress.com/2013/01/16/arms-and-crockpot-honey-sesame-chicken/